

How To Get Data From Php Server To Android Continuously Using A Background Thread
In this tutorial, y'all will larn what Docker is and how to use it to create a Dockerize a PHP applications for easy deployment. You'll learn how to use Continuous Integration and Deployment (CI/CD) to build and deploy the image on Heroku.
Dockerizing your PHP Application is beneficial because:
- Containers are portable and can be deployed instantly anywhere.
- Containers bring developers a compatible and streamlined work surroundings that tin be easily shared.
- Containers are the get-go step towards running your application with loftier availability with Docker Swarm or Kubernetes.
Afterward reading the tutorial you'll know what Docker is and how information technology works. You'll learn the ins and outs of combining Docker with PHP and how to use Continuous Integration and Commitment to test your application, build a container and deploy it.
Specifically, yous'll learn how to:
- Install Docker
- Run Docker images
- Build customer images to run programs
- Use Docker Compose to set upwardly a dev environment
- Run our application in Heroku
- Test our application with Continuous Integration (CI)
- Deploy our application with Continous Deployment (CD)
To practice, we volition showtime from a demo awarding which interacts with the Unsplash API to search for photos. The awarding is built with Laravel.
Permit'southward become started:
- Install Git in your automobile.
- Sign up with GitHub.
- Become to the demo application.
- Use the Fork push to copy the repository in your account:
- Clone the repository in your car. Open a concluding and type:
$ git clone YOUR_REPOSITORY_URL $ cd semaphore-demo-php-unsplash Run the Demo
To run the application in your car, yous'll demand:
- PHP 7
- The composer package managing director.
- I Unsplash API Key.
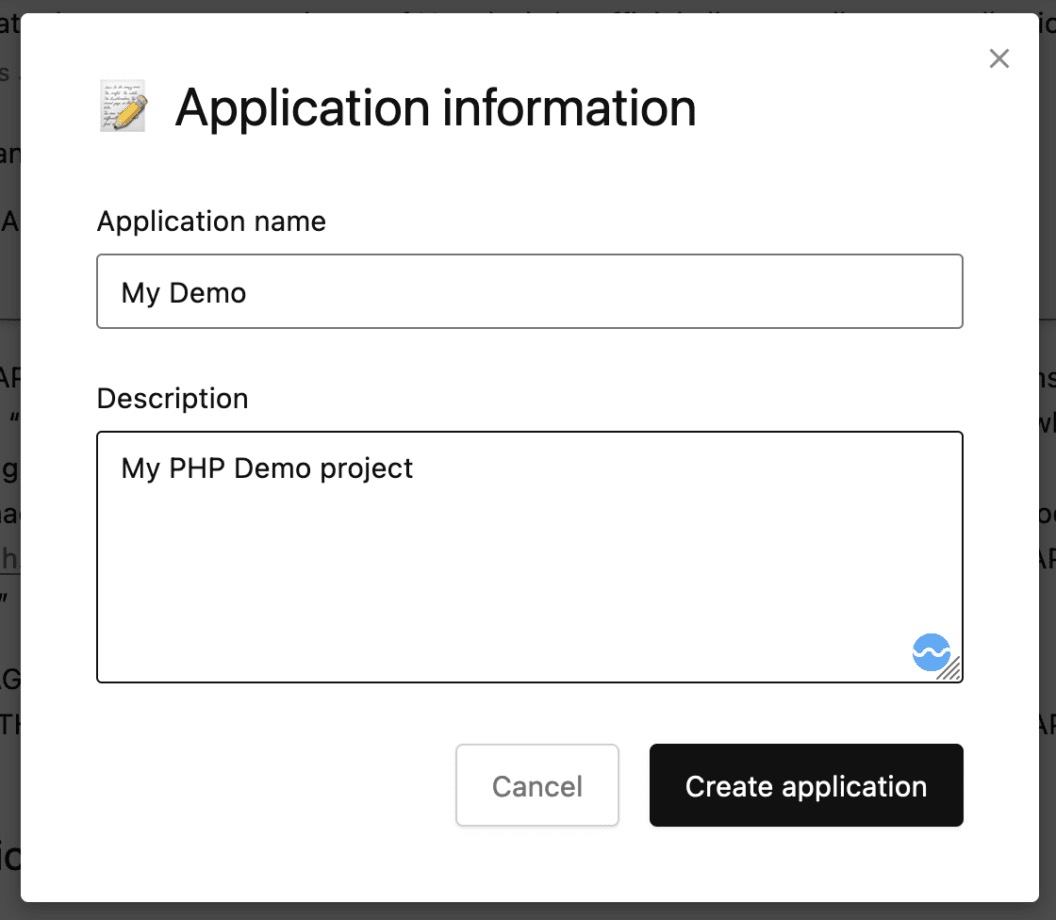
Getting the API Key is easy:
- Sign up to Unsplash.
- Get to Applications.
- Select New Awarding.
- Review and accept the Usage Terms.
- Gear up a name for the application.
- Re-create the Admission Key and the Hush-hush Cardinal shown.
- Prepare the application surroundings and install the dependencies:
$ cd src $ composer install $ cp .env.example .env $ cp .env.example.unsplash .env-unsplash $ php artisan central:generate You'll demand to import the Unplash Key as environs variables:
- Edit the
.env-unsplashfile. - Type in the Access and Hole-and-corner Keys side by side to the variables.
export UNSPLASH_ACCESS_KEY="YOUR ACCCESS Key" export UNSPLASH_SECRET_KEY="YOUR Underground KEY" - Source the file and start the application:
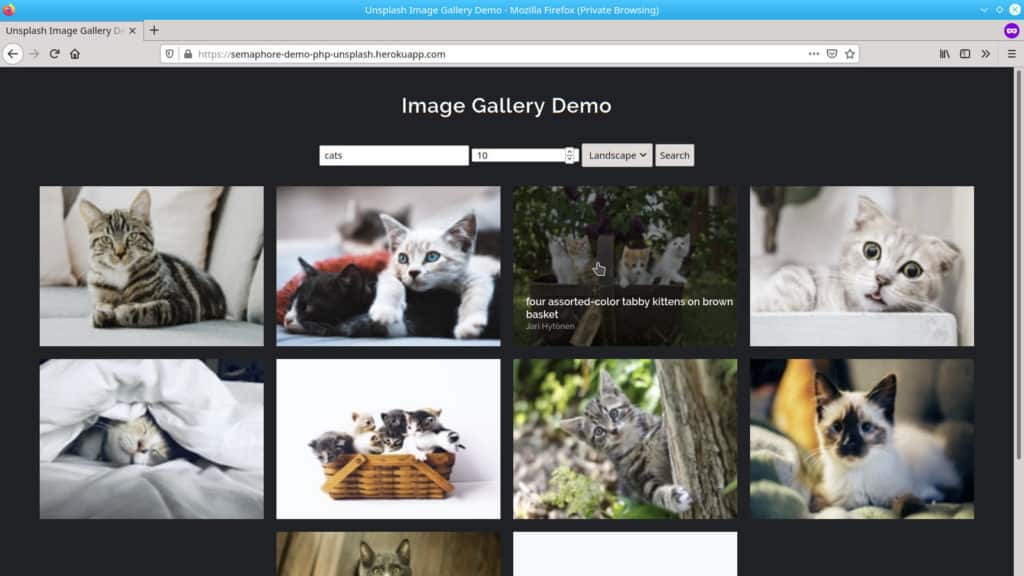
$ source .env-unsplash $ php artisan serve Open your browser on http://127.0.0.ane:8000 and attempt it out:

What is Docker?
Most developers use the (W|L|M)AMP stack as a starting bespeak, just this surroundings can become overwhelming very quickly. Once you starting time feeling this pain, you lot'll start using a virtual surround to share and reproduce with ease.
Docker provides usa with containers that take all the virtualization capabilities we need, while also existence more lightweight than the traditional virtual machines.
Prerequisites
Docker can exist installed on well-nigh platforms. You tin can install information technology from a binary executable, or by using the official installer.
Installing Docker
Docker Desktop
If you're using up-to-engagement versions of Windows or Mac, install Docker Desktop and you're done.
If you are a Linux user, Docker packages are popular and usually included in your distribution's repository. For example, installing it on Ubuntu or Debian is as easy as:
$ apt-go update && apt-get install docker Docker Images
Docker is based on the concept of building images that contain the necessary software and configuration for applications. Nosotros tin also build distributable images that incorporate pre-configured software like an Apache server, a caching server, MySQL database, etc. We can share our final image on Docker Hub to make information technology attainable to everyone.
Working with Docker Images
Nosotros tin list the available images on our machine by running the docker images control.
$ docker images REPOSITORY TAG Paradigm ID CREATED VIRTUAL SIZE ubuntu 14.04 91e54dfb1179 5 months agone 188.4 MB nimmis/apache-php7 latest bdd370e4f83b vi months agone 484.4 MB eboraas/apache-php latest 0501b3fdd0c2 6 months ago 367 MB mysql latest a128139aadf2 6 months ago 283.viii MB ubuntu latest d2a0ecffe6fa 7 months agone 188.iv MB eboraas/laravel latest 407e2d00b528 12 months ago 404.5 MB To browse the available images, nosotros tin visit Docker Hub and run docker pull <image> to download them to the host motorcar.
Docker Containers
We can liken a Docker epitome to a class definition. We define its properties and behavior. Containers are instances created from this class. We can create multiple instances of the aforementioned image. The docker ps command prints the list of containers running on the car. We don't have any containers at the moment, and so let'due south create a new ane:
$ docker run -d php:7.four-apache c6fbefcd630a2f4c970792af0302d9c25fe9118cec85091b04e75e7c942f5686 Nosotros created a new container from the php:7-apache prototype, and we used the -d flag to run the job in the background. The output hash is our container ID, nosotros can use information technology to access the container and play around with it:
$ docker ps CONTAINER ID Paradigm Command CREATED Status PORTS NAMES c6fbefcd630a php:7.4-apache "docker-php-entrypoi…" 39 seconds agone Up 38 seconds 80/tcp laughing_lalande We can see from the output that the container has an ID and a proper name. Permit's re-create another container and name it:
$ docker run -tid --proper noun="apache_server" php:7.4-apache fdae121b23e13690fedaab4636311d8ab6b35f32fa4c68e1c98726578de35a66 $ docker ps CONTAINER ID Paradigm Command CREATED Condition PORTS NAMES fdae121b23e1 php:7.four-apache "docker-php-entrypoi…" 16 seconds ago Upward xv seconds fourscore/tcp apache_server c6fbefcd630a php:7.4-apache "docker-php-entrypoi…" About a minute ago Up About a minute 80/tcp laughing_lalande Container instances are created almost instantly, you won't find whatever delay.
Nosotros can at present access our container by executing the bash command and attaching it to our terminal:
$ docker exec -it apache_server bash (you lot're now running a session within the container) $ /etc/init.d/apache2 status [ ok ] apache2 is running. To avoid polluting our figurer with unused containers, make certain to delete old ones:
# Delete container using ID or name docker rm -f <container-id-or-name> # Delete all bachelor containers docker rm -f $(docker ps -aq) Since our container is an Apache server, it makes sense to have a fashion to admission it through a browser. When creating an image, we need to make sure to betrayal it through a specific port Nosotros volition cover this in more detail in the Dockerfiles section.
$ docker run -tid \ -p 8000:80 \ --name apache_server \ php:7.4-apache We can get our container'due south IP with docker audit:
$ docker audit \ -f '{{range .NetworkSettings.Networks}}{{.IPAddress}}{{end}}' \ CONTAINER_ID_OR_NAME 172.xix.0.ii The last part is to map the Apache server to run our application instead of the default Apache homepage. This means that we need to keep our awarding binder synced with the server root folder (/var/www/html). Nosotros can do that using the -v option. Y'all can read more than about container volumes in the Docker documentation:
$ docker run -tid \ -p 8000:80 \ --name apache_server \ -v YOUR_HOST_WWW_ROOT:/var/www/html \ php:7.4-apache Information technology's always a practiced idea to take a wait at the image description on the Docker Hub and read the instructions about the proper to create containers from the image.
Working with Dockerfiles
We mentioned earlier that anybody can make a Docker paradigm and share it on the Docker Hub, and that Dockerfiles are the main tool to achieve this. Nosotros're going to see how nosotros can configure our own image and brand information technology fit our needs. You can check the documentation for the list of available commands.
Change one directory upwards to repository root:
$ cd .. The php:vii.4-apache image prepare the Apache public directory to /var/www/html. However, in this case, following Laravel's conventions, we need to set it to the /var/www/public. Ane way to achieve this is by setting upward a virtual host configuration. Create a file chosen 000-default.conf with the following contents:
# 000-default.conf <VirtualHost *:lxxx> ServerAdmin webmaster@localhost DocumentRoot /var/www/public <Directory /var/world wide web> Options Indexes FollowSymLinks AllowOverride All Require all granted </Directory> </VirtualHost> Apache, by default, listens on port 80 (HTTP), this isn't a trouble when running the server on your automobile. But some cloud providers require that containers apply different ports.
We'll create a script to dynamically override Apache's port when the container starts. Create a file chosen start-apache with the post-obit contents:
#!/usr/bin/env bash sed -i "s/Heed 80/Listen ${PORT:-eighty}/grand" /etc/apache2/ports.conf sed -i "s/:lxxx/:${PORT:-lxxx}/g" /etc/apache2/sites-enabled/* apache2-foreground And ensure the file is executable:
$ chmod 755 start-apache We're set to create a product-ready prototype. Create a file called Dockerfile.
Nosotros'll utilize the FROM clause to use the offical php apache images as a starting point:
# Dockerfile FROM php:vii.4-apache At present, we need COPY the file into the prototype:
... COPY 000-default.conf /etc/apache2/sites-available/000-default.conf ... Laravel requires Apache's mod_rewrite plugin to be enabled, nosotros can do this using the a2enmod utility. With RUN, we run commands inside the container:
... RUN a2enmod rewrite ... To become the source files inside the container, we can utilize the Re-create command over again:
... Re-create src /var/world wide web/ RUN chown -R world wide web-information:world wide web-data /var/www ... The concluding affair we demand to practice is to run the Apache server in the groundwork. The CMD command should be used but once in a Dockerfile, and it needs to have the following grade:
CMD ["executable","param1","param2"] We'll telephone call the start script we created earlier:
... CMD ["outset-apache"] The final Dockerfile should look like this:
FROM php:7.4-apache COPY 000-default.conf /etc/apache2/sites-available/000-default.conf Copy offset-apache /usr/local/bin RUN a2enmod rewrite # Copy awarding source Re-create src /var/www/ RUN chown -R www-information:www-information /var/www CMD ["start-apache"] Useful Commands
Although our image is ready, we'll go through some commands that could exist useful for many projects.
What if we wanted to install Node.js to manage our front-terminate avails?
RUN apt-get update && \ apt-get install nodejs This volition install Node.js and the npm managing director in our prototype. We can apply the RUN command many times inside the same Dockerfile, because Docker keeps a history for our image creation. Every RUN command is stored as a commit in the versioning history.
Another useful command is ENV. Information technology lets u.s. set an surroundings variable through the build process, and will also be present when a container is created. Be sure to cheque the total list of supported commands in the documentation.
ENV MYSQL_ROOT_PASSWORD=root ENV MYSQL_ROOT_USER=root Edifice the Prototype
If you've previously pulled the base image, information technology will be loaded from your estimator instead of being downloaded again. This means that the build process won't accept much time.
Our folder contains a Dockerfile, a 000-default.conf and starting time-apache. The docker build command will build the Dockerfile inside the current directory:
$ docker build . If we list our Docker images now, we'll see our new built paradigm:
$ docker images REPOSITORY TAG Image ID CREATED SIZE <none> <none> 19c684978566 20 seconds agone 451MB php seven.4-apache 0c37fe4343a5 two weeks ago 414MB Currently, our image has no name, the -t option allow us specify the image repository and tag.
Let'southward tag the image with a proper name. The syntax is:
$ docker tag SOURCE_IMAGE:TAG TARGET_IMAGE:TAG For the image we just congenital, we can utilize:
$ docker tag 19c684978566 YOUR_DOCKERHUB_USER/semaphore-demo-php-unsplash Using the Docker Hub username is optional. We simply take to employ it when pushing the paradigm to a registry. Since we'll practice that side by side, nosotros may too tag the image with the final name at present.
Our prototype is now labeled and tagged:
$ docker images REPOSITORY TAG IMAGE ID CREATED SIZE tomfern/semaphore-demo-php-unsplash latest 19c684978566 three minutes ago 451MBMB The final step is to button it to the Docker Hub. This pace is optional, just information technology'due south still useful if we're planning on sharing the image and helping others with their development surround:
$ docker login $ docker push button YOUR_DOCKERHUB_USER/semaphore-demo-php-unsplash - After logging into our Docker Hub business relationship, you lot should see the new epitome in the repository:

Docker Compose
Using terminals and remembering commands is not very practical for creating application containers and getting started speedily. Docker Etch uses YAML files to configure and run containers. This means that nosotros can send our application Dockerfile to build the environment and use a docker-compose.yml to run the containers.
The first footstep is to install Docker Composer on our machine. Follow the instructions in the Docker documentation before proceeding with the following steps.
We'll use docker-compose to run the application inside the container. This will speed upward development equally we tin gear up our work environment without having to install or configure an Apache server.
We'll map the source code files to the container'due south world wide web-root, that way we don't have to rebuild the Docker epitome while we code.
Create docker-etch.yml with the following contents:
# docker-etch.yml version: "three.ix" services: webapp: build: context: . dockerfile: ./Dockerfile.development ... This will build our image using a different, development-just Dockerfile called Dockerfile.development. If y'all already accept your image built locally or on the Docker Hub, you can utilise the image holding instead:
# docker-compose.yml version: "iii.nine" services: webapp: paradigm: YOUR_DOCKERHUB_USER/semaphore-demo-php-unsplash In the webapp service, nosotros'll specify the exposed ports, volumes, and optionally some environment variables.
... ports: - "8000:eighty" volumes: - ./src:/var/world wide web environment: - APP_KEY=SomeRandomStringToAddSecurity123 - APP_ENV=development - APP_DEBUG=true - APACHE_RUN_USER=apache-www-book - APACHE_RUN_GROUP=apache-www-book - UNSPLASH_ACCESS_KEY=${UNSPLASH_ACCESS_KEY} - UNSPLASH_SECRET_KEY=${UNSPLASH_SECRET_KEY} The final docker-compose.yml looks like this:
version: "3.9" services: webapp: build: context: . dockerfile: ./Dockerfile.development ports: - "8000:80" volumes: - ./src:/var/www environment: - APP_KEY=SomeRandomStringToAddSecurity123 - APP_ENV=evolution - APP_DEBUG=true - APACHE_RUN_USER=apache-www-volume - APACHE_RUN_GROUP=apache-www-volume - UNSPLASH_ACCESS_KEY=${UNSPLASH_ACCESS_KEY} - UNSPLASH_SECRET_KEY=${UNSPLASH_SECRET_KEY} In add-on to the Laravel and Apache variables, we're setting the Unsplash Access Key'southward from environment variables, so our application starts with the correct API tokens.
Create a new file chosen Dockerfile.development:
# Dockerfile.development FROM php:7.4-apache # Setup Apache2 config Re-create 000-default.conf /etc/apache2/sites-bachelor/000-default.conf RUN a2enmod rewrite CMD ["apache2-foreground"] The main difference is that Apache is started with the same user and group IDs every bit your own—unless permissions match, the application won't run.
At present, we tin can run docker-composer upward to create our container:
$ source .env-unsplash $ docker compose up --build Starting semaphore-demo-php-unsplash_webapp_1 ... done Attaching to semaphore-demo-php-unsplash_webapp_1 webapp_1 | AH00558: apache2: Could non reliably determine the server'southward fully qualified domain proper noun, using 172.19.0.2. Set the 'ServerName' directive globally to suppress this message webapp_1 | AH00558: apache2: Could not reliably determine the server's fully qualified domain name, using 172.nineteen.0.2. Set the 'ServerName' directive globally to suppress this message webapp_1 | [Friday Jan 17 thirteen:38:04.382337 2020] [mpm_prefork:notice] [pid 1] AH00163: Apache/2.4.38 (Debian) PHP/7.4.i configured -- resuming normal operations webapp_1 | [Fri Jan 17 13:38:04.382375 2020] [core:detect] [pid 1] AH00094: Control line: 'apache2 -DFOREGROUND' The command will attach the container output to the terminal, and nosotros'll need to printing ctrl+c to quit. We can avoid this past using the -d selection (docker-composer upwardly -d). If nosotros have multiple services, we can specify which ane (docker-composer upward server).
$ docker ps -a CONTAINER ID IMAGE COMMAND CREATED Status PORTS NAMES 7ec590488723 semaphore-demo-php-unsplash_webapp "docker-php-entrypoi…" 45 minutes ago Upward 27 minutes 443/tcp, 0.0.0.0:8000->eighty/tcp semaphore-demo-php-unsplash_webapp_1 Utilise the docker-compose end|rm to manage your container.
Finally, add all the new files to your repository:
$ git add docker-compose.yml 000-default.conf Dockerfile* start-apache $ git commit -grand "add docker and apache config" $ git push origin chief Using Docker with Heroku
Heroku is a hosting platform that can run our Docker images straight. Cheque the documentation for the instructions.
To get started:
- Sign up with Heroku.
- Click on your business relationship portrait and so on Business relationship.
- Roll down until the API Keys department. Request an API Key and copy the value. We'll demand it later.

- Create a New Application, recollect its name for later.
- Install the Heroku CLI in your motorcar and log in. This will open up a browser window for you to login:
$ heroku login $ heroku container:login - Heroku has its ain Docker registry. We have to tag and push the image using your application proper name:
$ docker tag YOUR_DOCKERHUB_USERNAME/semaphore-demo-php-unsplash registry.heroku.com/YOUR_HEROKU_APP_NAME/web $ docker push button registry.heroku.com/YOUR_HEROKU_APP_NAME/web - Set the environment variables for the awarding. The APP_KEY should be a random 32 grapheme string:
$ heroku config:set up UNSPLASH_ACCESS_KEY=YOUR_UNSPLASH_ACCESS_KEY $ heroku config:set UNSPLASH_SECRET_KEY=YOUR_UNSPLASH_SECRET_KEY $ heroku config:prepare APP_ENV=product $ heroku config:set up APP_KEY=SomeRandomStringToAddSecurity123 - Finally, enable some Docker optimizations and release the awarding:
$ heroku labs:enable --app=YOUR_HEROKU_APP_NAME runtime-new-layer-excerpt $ heroku stack:ready container --app YOUR_HEROKU_APP_NAME $ heroku container:release web --app YOUR_HEROKU_APP_NAME The application should now exist up and running at: http://YOUR_HERKOU_APP_NAME.herokuapp.com
Continuous Integration With Semaphore
Up to this point, we've been throwing commands left and correct, installing things, and trying stuff upward. Surely, mistakes were made and we had to go back a try again — that's all right, it'due south the only way to learn.
Sooner or later, we'll desire to produce results in a consistent manner and we'll capeesh whatever tool and practices that help united states automate testing and deployment.
In the section, nosotros'll larn how to create a CI/CD Pipeline to automate all processes.
Continuous Integration (CI) is the practise of testing the application on each update, so every bit presently equally we introduce a bug, we know it. Semaphore has made it like shooting fish in a barrel to continuously integrate our code:
- Head to Semaphore and sign upwards using the Sign upwardly with GitHub button.
- The side by side step is to load your Unsplash Access Primal to Semaphore. To securely store sensitive information, Semaphore provides the secrets feature. When nosotros reference a secret in Semaphore, it'southward automatically decrypted and made bachelor:
- On the left navigation menu, click on Secrets below Configuration.
- Click Create New Secret.
- Create the surroundings variables as shown, the proper noun of the hole-and-corner should be
unsplash-api:

- Create a second secret to store Docker Hub credentials:

- Create a tertiary and final secret called "heroku" to store the Heroku API Fundamental:

Now we need to add together the GitHub repository to Semaphore:
- On the left navigation menu, click on the + (plus sign) side by side to Projects:

- Find the demo repository and click on Cull:

- Select the I volition use the existing configuration option. The demo ships with a starter configuration.
- Semaphore will selection up any existing CI configuration once we make a modification: edit whatsoever file (for example, the README), commit and push the change to the repository.
- Go dorsum to Semaphore to see that the CI workflow has already started:

Let's examine the existing configuration to learn how Semaphore works:
- Click on Edit Workflow to open up the Workflow Architect.
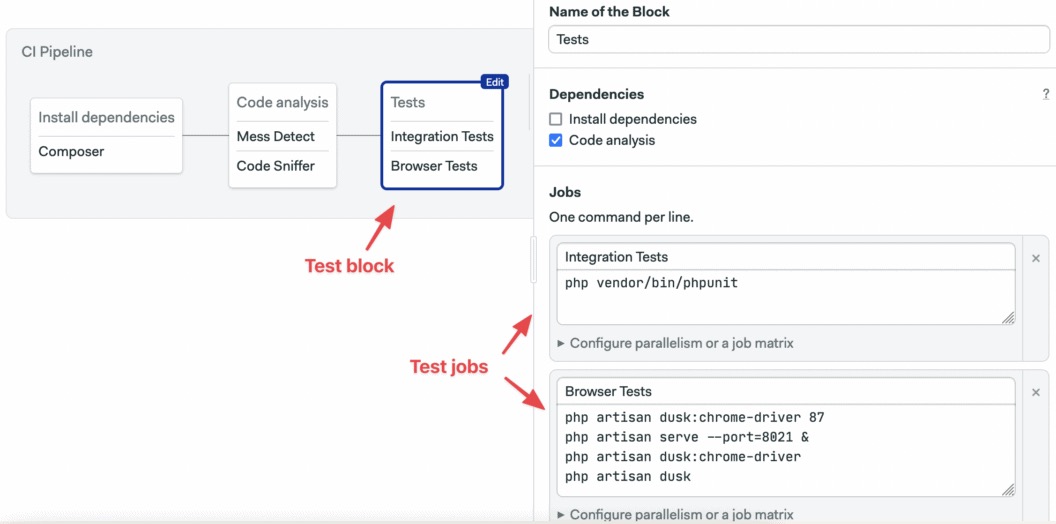
- Click on the master grey box called CI Pipeline. The main pipeline components are:

Semaphore chief components are:
- Pipelines: A pipeline fulfills a specific task, such as testing and deploying. Pipelines are made of blocks that are executed from left to right.
- Amanuensis: The agent is the virtual auto that powers the pipeline. We take three machine types to choose from. The machine runs an optimized Ubuntu 20.04 epitome with build tools for many languages.
- Blocks: Blocks are made of jobs that accept a shared configuration and purpose, for example, building or testing. 1 all jobs in a cake complete, the side by side cake tin begin.
- Jobs: Jobs contain commands that do the piece of work. Jobs within a cake run in parallel, each one in its own carve up environment.
The CI pipeline master objective is to test the lawmaking in a clean environment. It will deed as a filter, preventing failures from reaching product. When designing CI, nosotros want to put those tests that are more than likely to neglect or fail fast first.
Larn more than nearly PHP Testing: 7 Continous Integration Tools for PHP Laravel
The Install dependencies block downloads the PHP modules with composer:

The job uses some Semaphore congenital-in commands:
- checkout: clones the GitHub repository into the CI auto. Most jobs will do a checkout at the commencement.
- enshroud: automatically detects the projection structure and
storePHP modules in the Semaphore cache.cache restorerecollect the files to avoid having to download them again.
The Code Analysis block runs linters and code coverage tests to find potential bug and style issues. When nosotros have multiple jobs in a block, we tin put the shared setup commands in the prologue. The prologue is executed before each chore:

The Tests cake runs integration and browser tests. The cake imports the app-env secret equally it'south required to run and test the application:
Continuous Deployment on Semaphore
We'll extend of CI workflow with 2 additional pipelines:
- Dockerize: to build a production Docker image.
- Deploy: to deploy the image to Heroku.
To create a new pipeline, we'll ready a promotion:
- Click on + Add together Promotion.
- Name the promotion: "Dockerize"

- Check the Enable automatic promotion selection:

- Scroll right and name the pipeline: "Docker build".
- Click on the new block and modify its proper name to: "Docker build".
- Open the Prologue and blazon the post-obit contents:
checkout cd src cache restore composer install --no-dev cd .. - Prepare the proper name of the job to "Build" and type the following commands:
echo "$DOCKER_PASSWORD" | docker login --username "$DOCKER_USERNAME" --countersign-stdin echo "$DOCKER_PASSWORD" | docker login --username "$DOCKER_USERNAME" --password-stdin docker pull "$DOCKER_USERNAME"/semaphore-demo-php-unsplash:latest || true docker build --cache-from "$DOCKER_USERNAME"/semaphore-demo-php-unsplash:latest -t "$DOCKER_USERNAME"/semaphore-demo-php-unsplash:$SEMAPHORE_WORKFLOW_ID . docker button "$DOCKER_USERNAME"/semaphore-demo-php-unsplash:$SEMAPHORE_WORKFLOW_ID - Open the Secrets section and select
dockerhub:

- Click on Run the Workflow and so on Outset:

Find that nosotros're tagging our new images with a special variable $SEMAPHORE_WORKFLOW_ID. The variables is unique for each workflow, which will assistance u.s. place which image version corresponds to each git commit and CI/CD run.
The Semaphore Container Registry
The Dockerize pipeline builds the awarding prototype using two sources: the PHP base image and the latest build. Later on edifice, the resulting image is pushed to Docker Hub in grooming for the deployment Correct now, both images are pulled and pushed to Docker Hub. This back-and-forth from Docker Hub and Semaphore is a scrap wasteful, we can optimize the build task by switching to the Semaphore Container Registry, which hosts popular base images, is faster, more convenient, and doesn't count against Docker Hub rate limits.
To switch repositories, first get the latest commit from GitHub:
$ git pull origin master Replace the entire contents of the Dockerfile with the following lines. The Semaphore paradigm doesn't come with Apache, so we'll add a command to install it in the build process.
FROM php:7.4-apache COPY 000-default.conf /etc/apache2/sites-bachelor/000-default.conf Re-create start-apache /usr/local/bin RUN a2enmod rewrite COPY src /var/www/ RUN chown -R www-information:www-data /var/www CMD ["get-go-apache"] Finally, commit the change to GitHub. The Dockerize pipeline should work a scrap faster now.
$ git add together Dockerfile $ git commit -m "utilise semaphore docker registry" $ git push origin master Deployment Pipeline
Semaphore knows who to build our Docker image and volition do it on each update.
We tin practice even more than! How about a one-click deployment to Heroku? Let'south add a Deployment pipeline:
- Printing Edit Workflow again.
- Coil right and employ + Add together Promotion. Proper noun the promotion: "Deploy to Heroku"
- Click on the new pipeline, call it: "Deploy to Heroku".
- Select the block, let's name it: "Deploy".
- Open Environs Variables and set the variable
HEROKU_APPto your Heroku application name. - Open up Secrets and check
dockerhub,heroku, andapp-env. - Name the job "Deploy" and blazon the post-obit commands in the box:
echo "${DOCKER_PASSWORD}" | docker login -u "${DOCKER_USERNAME}" --password-stdin docker pull "$DOCKER_USERNAME"/semaphore-demo-php-unsplash:$SEMAPHORE_WORKFLOW_ID docker tag "$DOCKER_USERNAME"/semaphore-demo-php-unsplash:$SEMAPHORE_WORKFLOW_ID registry.heroku.com/$HEROKU_APP/web heroku container:login docker button registry.heroku.com/$HEROKU_APP/web heroku config:ready UNSPLASH_ACCESS_KEY="$UNSPLASH_ACCESS_KEY" heroku config:ready UNSPLASH_SECRET_KEY="$UNSPLASH_SECRET_KEY" heroku config:gear up APP_ENV=production heroku config:fix APP_KEY=qiRKsBnNoFwwOo77rDVJbK1N6IQyBKHf heroku labs:enable --app=$HEROKU_APP runtime-new-layer-extract heroku stack:prepare container --app $HEROKU_APP heroku container:release web --app $HEROKU_APP 
Nosotros'll add ane more than block. Information technology'll set the current image tag to latest. That way, we'll e'er know what it the most up-to-appointment image in product:
repeat "${DOCKER_PASSWORD}" | docker login -u "${DOCKER_USERNAME}" --countersign-stdin docker pull "$DOCKER_USERNAME"/semaphore-demo-php-unsplash:$SEMAPHORE_WORKFLOW_ID docker tag "$DOCKER_USERNAME"/semaphore-demo-php-unsplash:$SEMAPHORE_WORKFLOW_ID "$DOCKER_USERNAME"/semaphore-demo-php-unsplash:latest docker pull "$DOCKER_USERNAME"/semaphore-demo-php-unsplash:latest - Add a second cake chosen "Tag latest image".
- On Secrets, select dockerhub
- Blazon the following commands in the job box:

- Click on Run the Workflow and Start.
The new CI/CD pipeline volition start immediately. Once the Docker prototype is ready, click on the Promote button. And the new image will exist deployed to Heroku:

Decision
In this tutorial, we learned the basics of using Docker and how to create our ain Docker image. We deployed a demo application to Heroku, and nosotros used Semaphore for continuous deployment to the product server.
Take a look at the terminal demo on Github. If you have whatever questions or comments, make certain to post them below, and nosotros'll practise our all-time to answer them.
Read side by side:
- Download our complimentary ebook: CI/CD for Docker and Kubernetes
- CI/CD for Microservices on DigitalOcean Kubernetes
- Lightweight Docker Images in 5 Steps
- Deploying Python applications to Heroku using Docker

How To Get Data From Php Server To Android Continuously Using A Background Thread,
Source: https://semaphoreci.com/community/tutorials/dockerizing-a-php-application
Posted by: thomashinticts1956.blogspot.com
0 Response to "How To Get Data From Php Server To Android Continuously Using A Background Thread"
Post a Comment